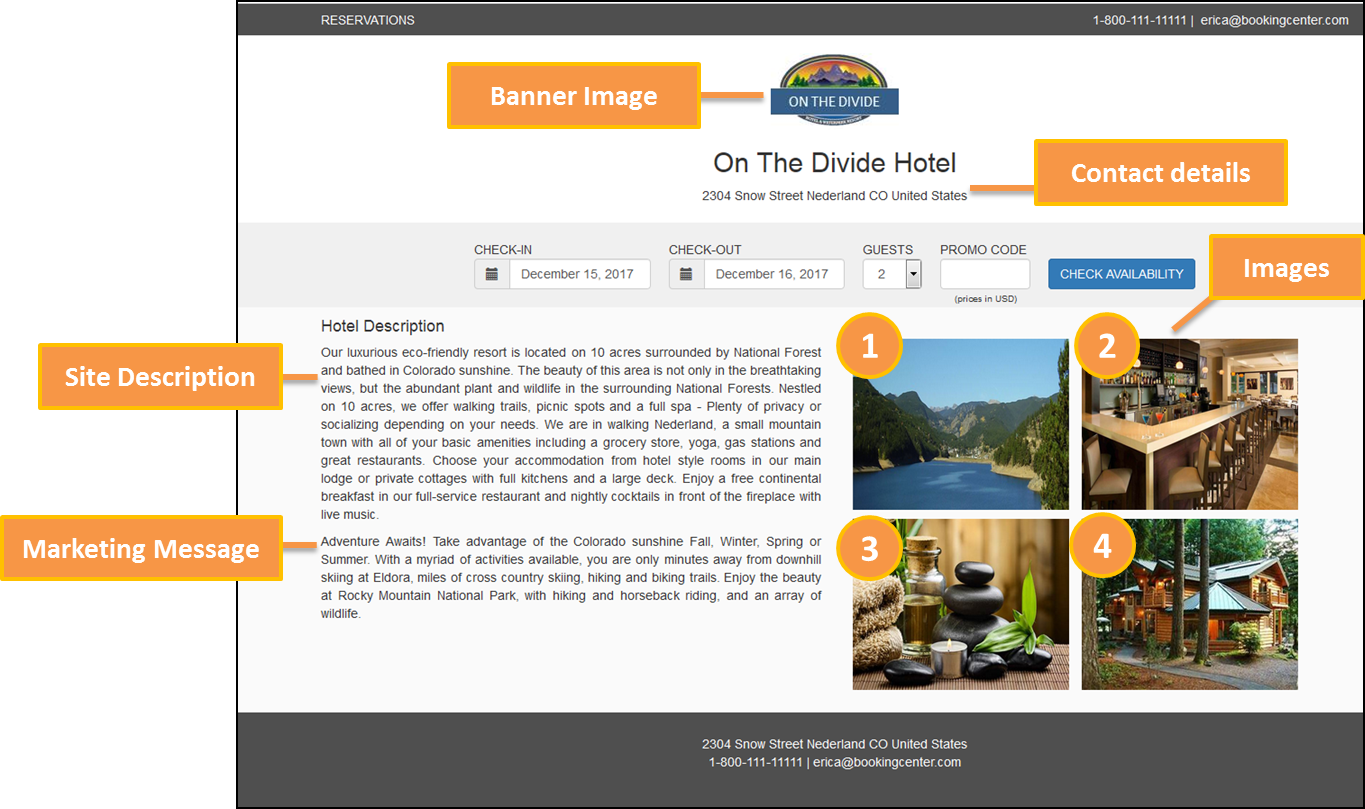
The first page of the Booking Engine can be customized with a Banner, Hotel Description and Images. To edit these information, please follow the instructions below.
However, many customers to choose to avoid this page entirely, and use the Quick Reservation feature on their website to present a clear 'call to action' accepting 'Arrival Date" and 'Departure Date' so that, when submitted, the user gets availability results from the Booking Engine for those dates. This approach has been shown to generate more bookings - look at major hotel websites and this is how they implement the Booking Engine. We describe how you can do this in this KnowledgeBase article.
Booking Engine
- Booking Engine | Website Code
- Booking Engine | Customize Front Page
- Booking Engine | Room Description
- Booking Engine | View Details
- Booking Engine | Image Slideshow
- Booking Engine | Rate Plans
- Booking Engine | Policies
- Booking Engine | Confirmation Letter
- Booking Engine | Custom URL Links
- Booking Engine | Custom HTML
- Booking Engine | ADA Compliance
- Booking Engine | Sojern and DerbySoft
- Booking Engine | Inventory Items and Packages
- Booking Engine | Select Rooms and Rates
- Booking Engine | Content Security Policy (CSP)
- Payment Technologies Offered for Online Bookings
- Lowest Rate on Calendar
Click image to enlarge
Banner Image
Insert any image you choose as the Banner image. This can be a logo, graphic, image, etc.
- The file you upload must be in a .JPG format.
- Recommended max. height for a logo is 120 pixels. Recommended size for a Banner iimage.Max width1200 px X 120px
To change your Banner image in MyPMS, go to SETUP | FEATURES AND IMAGES | IMAGES. The first image in the list For step-by-step instructions on how to edit this information, see Images
Contact Details
The address, phone number and email address displayed are entered in SETUP | PMS | SITE DETAILS. For step-by-step instructions on how to edit this information, see Site Details
Hotel Description
The Hotel Description area can be customized by going to SETUP | SETTINGS | MARKETING AND POLICIES. There are two fields that can be used to to customize the Hotel Description. Together these two field make up the Hotel Description displayed. For step-by-step instructions on how to edit this information, see Marketing And Policies
- The 1st paragraph of the Hotel Description displays the text entered in Site Description.
- The 2nd paragraph of the Hotel Description displays the text entered in Marketing Message.
Images:
There are four images displayed on the front page of the Bookng Engine. These images are taken from SETUP | FEATURES AND IMAGES | IMAGES . The IMAGES section displays a list of image names. The Booking Engine uses four of these images on the front page. These images are uploaded to the following Image names and are ordered as shown on the Example above. For step-by-step instructions on how to edit this information, see, see Images
- Image 1: Property
- Image 2: Exterior
- Image 3: Conference
- Image 4: Restaurant
Overview
Content Tools