SELF CHECK-IN SET UP STEPS
Since Self Check-in is completely automated from start to finish and integrated with the booking process in MyPMS, there are only three steps for you to complete in MyPMS to set up Self Check-in for your site. How you customize these Letters is dependent on how you want run your Self Check-in process.
To setup Self Check-in for your property, follow these steps. Read below for instructions on each step.
STEP 3: Set Default Email Letters (SMS Messages)Letters used for Self Check-in
- STEP 4: Set the Settings used to control the timing of the Self Check-in Process and the "eSign Digital Signature" Settings
"Self Check-in Exempt" and "eSign Exempt"
Each booking has an option to be flagged as "Self Check-in Exempt" and/or "eSign Exempt" and these settings are managed via the Booking Data tab on the specific booking desired to be 'exempted' from the automated Self Check-in process. When flagged "Self Check-in Exempt", that particular booking will not send Self Check-in Letter(s) and/or SMS messages. When flagged "eSign Exempt", that particular booking will not require the eSign document be completed to enable a Self Checkin-in, but it will still be allowed Self Check unless "Self Check-in Exempt" is also flagged on. To lean how to use this setting see Self Check-in | Exempt Settings
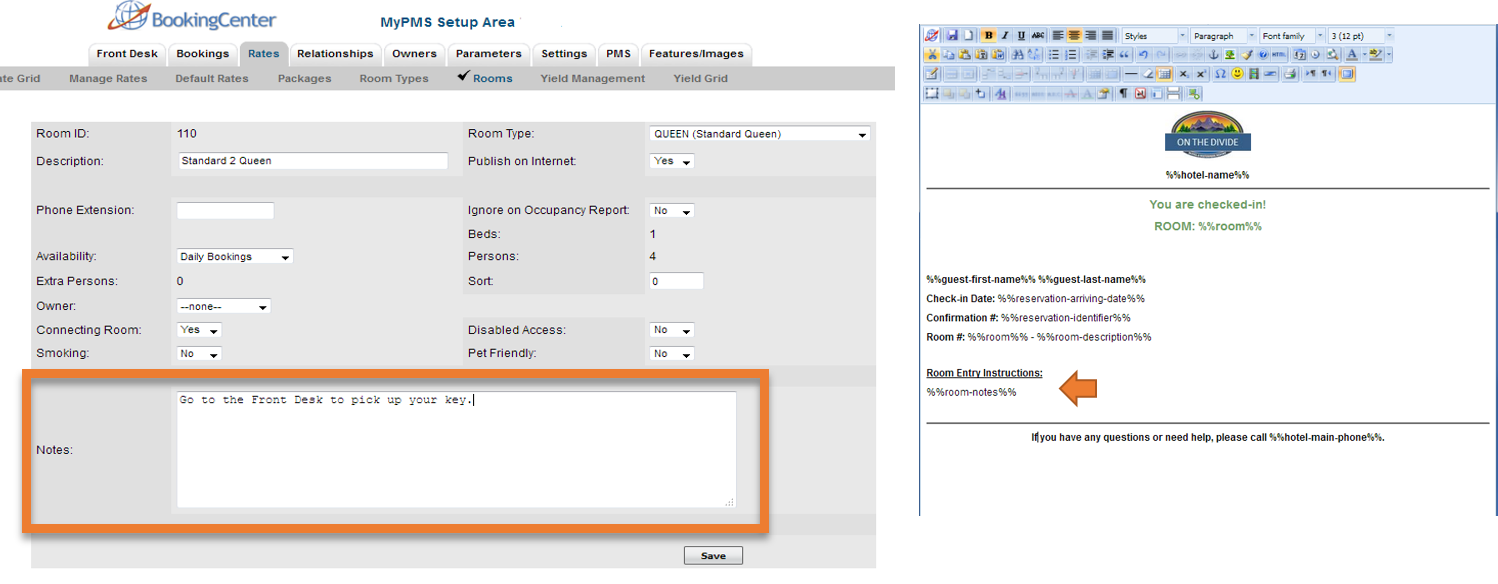
Self Check-in
STEP 1: Enter Room Entry Information in MyPMS The Room Entry Instructions are displayed to the Guest in MyBooking and automatically sent to the Guest via email and/or SMS in the "Self Check-in Complete" Letter when the guest is checked-in. The instructions displayed and sent to guests is customized to each Room in the “Room Notes” field of each Room. The “Room Notes” merge field is then inserted as into the Email Letter and/or SMS Message. Therefore, you need to enter the Room Entry Instructions you want sent to guests in the “Room Notes” field for every Room in MyPMS, even if the instructions are the same for all Rooms. For step-by-step instructions, see Add or Edit Rooms
STEP 2: Customize the Default Letters used in the Self Check-in Process.
These are the Letters that will be used to communicate to Guests during the Self Check-in process. They are a very important part of the process as Guest Communication is crucial for the the Self Check-in process to work as seamlessly as possible. The Letters used for email are required for the Self Check-in process to function. SMS Messaging is optional and requires a subscription. There are three Letters that need to be created for the Self Check-in process, four if you are using eSign Digital Document Signing (Note: an SMS Message must also be created for each Letter if you are using SMS). See detailed information on Creating Default Letters
- "Self Check-in Start" Letter starts the self check-in process by automatically sending the Guest an email and/or SMS with a secure link to access MyBooking.
- "Self Check-in Complete" Letter contains your customized room entry information and instructions and is displayed to the guest in MyBooking and automatically sent to the Guest when self check-in is complete.
- "MyBooking Cancellation Letter" is the Letter is automatically sent to Guests when they cancel their booking.
- OPTIONAL: "eSign Digital Request" Letter If you want to require a digital signature for check-in, the BookingCenter eSign-Digital Document Signing lets you create a customized Letter with a digital signature function and send it to a guest to open and digitally sign via a secure link attached to their booking. Learn how to use eSign - Digital Document Signing
We have provided Default Template Letters for both email and SMS Messages for you to customize in SETUP | LETTERS area of MyPMS, they are listed at the bottom of your Letters and SMS Messages Lists. Please review the Templates and feel free to use them “as-is” or customize to your property by adding or editing text, images or merge fields. See detailed information on Creating Default Letters If you are using SMS Messages, then see Add or Edit SMS Messages.
STEP 3: Set Default Email Letters (SMS Messages)Letters used for Self Check-in
Once you have created the Self Check-in Letters, they need to be selected as the Default Letters in SETUP | PARAMETERS | DEFAULT LETTERS. The Default Letter for Email is required for the Self Check process to function. The SMS Messaging is optional. To choose one or both of these as the delivery method, you simply need to select the Default Letter you created or the template provided in the respective drop-down list for Email or SMS. If you do not want to send an SMS message, then do not select a Letter in the drop-down menu and leave it on "Select Letter". For step-by-step instructions, see Self Check-in | Default Letters
Optionally, you can also schedule an additional "Self Check-in Start" Letter to be sent to the Guest before the check-in date using Auto Letters
To get started, see SMS Module Pricing Feel free to use the Default Templates “as-is” or customize to your property by adding or editing text, images or merge fields.
STEP 4: Set the Settings used to control the timing of the Self Check-in Process and the "eSign Digital Signature" Settings
Self Check-in Communication Timing
The "Communication" setting is used to control the START TIME of the Email and/ SMS sent to the guest to start the Self Check-in process on the arrival date of the booking. This setting controls the automated system trigger that automatically sends the "Start Self Check-in" email and/or SMS to the all guests on arrival date. For bookings made before or after this time setting, see
There are two settings, one to control the time that the email and one to control when the SMS message.
- Send SMS Time: Enter the time that you want the "Start Self Check-in" and "eSign Request" (if enabled) EMAIL sent to the guest. The time must be entered in military time, ie. 14:00 for 2:00pm. The time setting corresponds to the time zone set in your MyPMS system. Therefore, if your system is set to "Pacific Standard Time" and you enter 14:00, then the email will be sent to the Guest at 2:00PM PST.
- Send SMS Time: Enter the time that you want the "Start Self Check-in" and "eSign Request" (if enabled) SMS sent to the guest. The time must be entered in military time, ie. 14:00 for 2:00pm. The time setting corresponds to the time zone set in your MyPMS system. Therefore, if your system is set to "Pacific Standard Time" and you enter 14:00, then the email will be sent to the Guest at 2:00PM PST.
"eSign Digital Signature" Settings
You can enable eSign Digital Document Signing as a required part of the Self Check-in process. This setting will automatically send a request for digital signature and can become a requirement for Self Check-in.
Use the "esign" setting to control how the esign communication process functions with Self Check-in. There are four settings to choose from:
- None: Use this setting to completely disable eSign from the Self Check-in process. What this means is that the guest will not receive an email and/or SMS request to sign a digital document.
- Request Letter(s): Use this setting to to request a Digital Signature, but NOT REQUIRE a Digital Signature to Check-in. Using this setting will send an "eSign Request" email and/or SMS to the Guest at the Start of the Self Check-in process. This request is in addition to the "Start Self Check-in" email and/or SMS that is sent to start the Self Check-in process.
- Required MyBookings and Letter(s): Use this setting to REQUIRE a Digital Signature before the guest can check-in AND to send the eSign Request email and/or SMS as described in the Request Letter setting. Using this setting will send an "eSign Request" email and/or SMS to the Guest at the Start of the Self Check-in process, but WILL require a Digital Signature before the guest can complete Self Check-in.
- Required MyBookings no Letter(s): Use this setting to REQUIRE a Digital Signature before the guest can check-in, but NOT SEND the eSign Request email and/or SMS as described in the Request Letter setting. Using this setting will NOT SEND an "eSign Request" email and/or SMS to the Guest at the Start of the Self Check-in process, but WILL require a Digital Signature before the guest can complete Self Check-in.
Overview
Content Tools