| Section |
|---|
STEP 4: Set the Settings used to control the timing of the Self Check-in Process and the "eSign Digital Signature" Settings Self Check-in Communication Timing The "Communication" setting is used to control the START TIME of the Email and/ SMS sent to the guest to start the Self Check-in process on the arrival date of the booking. This setting controls the automated system trigger that automatically sends the "Start Self Check-in" email and/or SMS to the all guests on arrival date. For bookings made before or after this time setting, see There are two settings, one to control the time that the email and one to control when the SMS message. - Send SMS Time: Enter the time that you want the "Start Self Check-in" and "eSign Request" (if enabled) EMAIL sent to the guest. The time must be entered in military time, ie. 14:00 for 2:00pm. The time setting corresponds to the time zone set in your MyPMS system. Therefore, if your system is set to "Pacific Standard Time" and you enter 14:00, then the email will be sent to the Guest at 2:00PM PST.
- Send SMS Time: Enter the time that you want the "Start Self Check-in" and "eSign Request" (if enabled) SMS sent to the guest. The time must be entered in military time, ie. 14:00 for 2:00pm. The time setting corresponds to the time zone set in your MyPMS system. Therefore, if your system is set to "Pacific Standard Time" and you enter 14:00, then the email will be sent to the Guest at 2:00PM PST.
"eSign Digital Signature" Settings You can enable eSign Digital Document Signing as a required part of the Self Check-in process. This setting will automatically send a request for digital signature and can become a requirement for Self Check-in.
Use the "esign" setting to control how the esign communication process functions with Self Check-in. There are four settings to choose from: - None: Use this setting to completely disable eSign from the Self Check-in process. What this means is that the guest will not receive an email and/or SMS request to sign a digital document.
- Request Letter(s): Use this setting to to request a Digital Signature, but NOT REQUIRE a Digital Signature to Check-in. Using this setting will send an "eSign Request" email and/or SMS to the Guest at the Start of the Self Check-in process. This request is in addition to the "Start Self Check-in" email and/or SMS that is sent to start the Self Check-in process.
- Required MyBookings and Letter(s): Use this setting to REQUIRE a Digital Signature before the guest can check-in AND to send the eSign Request email and/or SMS as described in the Request Letter setting. Using this setting will send an "eSign Request" email and/or SMS to the Guest at the Start of the Self Check-in process, but WILL require a Digital Signature before the guest can complete Self Check-in.
- Required MyBookings no Letter(s): Use this setting to REQUIRE a Digital Signaturebefore the guest can check-in, but NOT SEND the eSign Request email and/or SMS as described in the Request Letter setting. Using this setting will NOT SEND an "eSign Request" email and/or SMS to the Guest at the Start of the Self Check-in process, but WILL require a Digital Signature before the guest can complete Self Check-in.
|
| Section |
|---|
Step 1: Confirm that your SITE is enabled for Self Check-in.
BookingCenter Self Check-in interface must be enabled for your site and requires a service agreement with an additional monthly fee. If you have not subscribed to this interface and want to enable Self Check-in, please contact us.
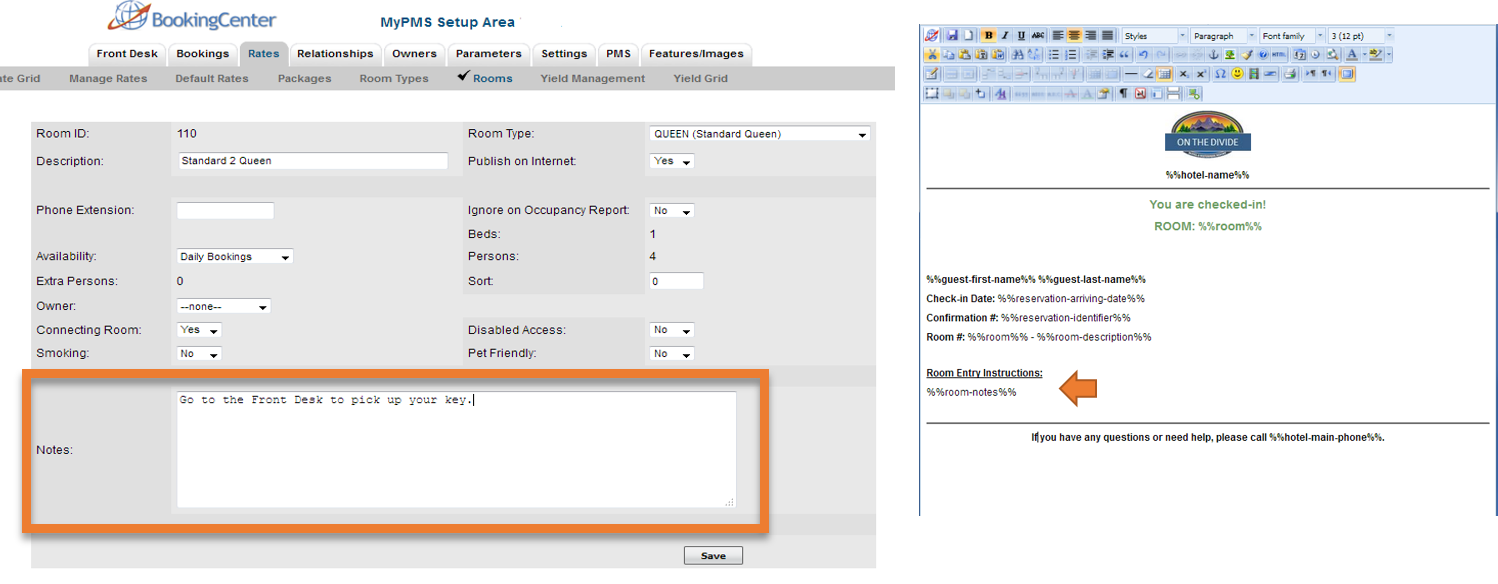
Step 2: Enter the Room Entry instructions in the "Room Notes" Field in your Rooms.
The first step to Self Check-in is to enter the specific Room Entry information into the "Room Notes" field of each Room. This field is used to display the Room Entry information to guests when they complete check-in in MyBooking AND in the email and SMS sent to the guest when they complete check-in. The Room Entry instructions will display in the Self Check-in Complete Letter. In order for this information to be automatically emailed and/or SMS to the guest, you must enter the information in the Room AND insert the merge field the "Self Check-in Complete" Letter. This Letter can be created by you or you can edit the Default Template provided. The merge field to be used for this Letter is the "Room Notes" under "Booking Details" of the Letter Editor. See Merge Fields - SMS Letters
After this letter is created, it must be set up as an Auto Letter function to be automatically emailed to the Guest on the check-in date. or sent manually in the Letters Tab of the Bookng.
To enter the Room Entry Instructions in each Room, follow these steps
- Go to SETUP | RATES | ROOMS.
- Click on the Room to open the Room Details.
- Click Edit
- Go to the Room Notes field.
- Enter Room Entry Information.( We recommend that this is kept short and easy to read as most guests will view this information on their mobile device - if you have more arrival information to communicat to the guest, it can be added to the "Room Entry Information" Letter emailed to the Guest.
- Click Save.
Step 3: Create "Self Check-in" Email Letter and/or SMS
Create the Letter and/or SMS that will be emailed and messaged to guests to start the Self Check-in Process This Letter/Message is what the Guest receives on the check-in date, requesting them to start check-in and a link to MyBooking. The link to MyBooking must be inserted into this letter using a merge field. It can be inserted anywhere in the Letter, but must be there in order for the Guest to start Self Checkin and/or manage their booking details.
After this letter is created, it must be set up as an Auto Letter function to be automatically emailed to the Guest on the check-in date. or sent manually in the Letters Tab of the Bookng.
To Create the "Self Check-in" Email Letter, follow these steps
- Go to SETUP | PARAMETERS | LETTERS and either create a new Letter or edit an existing Letter by clicking on the Letter ID. We provide a default "Self Check-in" Letter that you can customize to your property.
There are two MyBooking merge fields,%%ruid_link%%", that you can insert into your Letters depending on your needs. This link will display a link to MyBookings.
To insert either or both of these merge fields into your Letter:
Place your cursor inthe body of the Letter where you want the Self Checkin link to display.
Go to the BookingCenter Globe Icon and the "Booking Details" Section. Select the merge field and it will be inserted into your Letter where the cursor is.
Click Update to save changes.
To Create the "Self Check-in" SMS message, follow these steps
- Go to SETUP | PARAMETERS | LETTERS
Click on Add. - In the Letter Type drop-down menu, select SMS.
- Enter the text for SMS message. There is a limit of 500 characters.
There are two MyBooking merge fields, %%ruid_link%%", that you can insert into depending on your needs. This link will display a link to MyBookings.
To insert either or both of these merge fields into your Letter:
Place your cursor inthe body of the Letter where you want the Self Checkin link to display.
Go to the BookingCenter Globe Icon and the "Booking Details" Section. Select the merge field and it will be inserted into your Letter where the cursor is.
Click Update to save changes.
| Section |
|---|
| Column |
|---|
|
|
| Column |
|---|
|
| Column |
|---|
width | 20%