All changes to Rates and Restrictions are made in SETUP | RATES | MANAGE RATES.
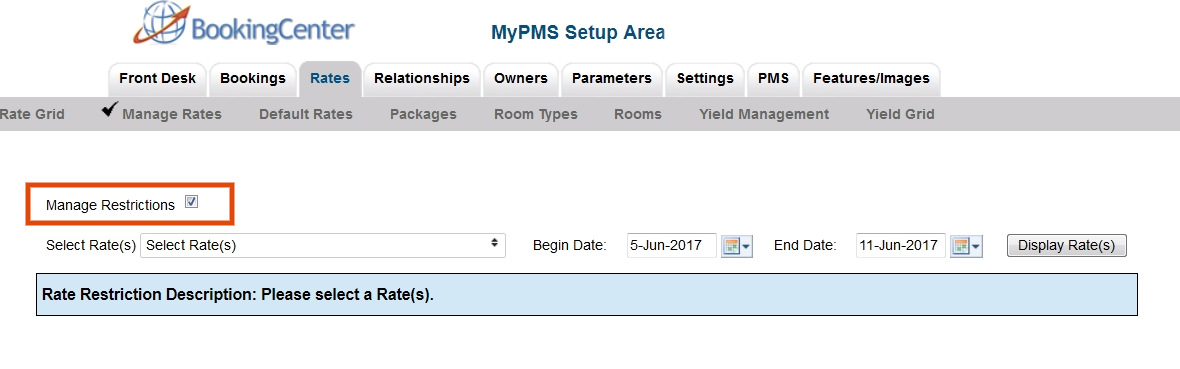
The Manage Restrictions function is an optional setting and is enabled in SETUP | SETTINGS | GENERAL SETTINGS. The feature must be set to "Yes" to make Manage Restrictions function visible under Manage Rates. For instructions on how to enable Manage Restrictions, see General Settings
All changes to Rates and Restrictions are made in SETUP | RATES | MANAGE RATES. The Manage Restrictions function allows you to display ONLY the Restrictions for a Single Rate Plan and change the Restrictions for multiple Rate Plans at the same time.
In order for a Rate Plan to appear in the "Select Rates" drop-down list, a Default Rate Plan must first be set up. Once a Parent or Child Rate Plan is set up, it will appear in the list and restrictions can be adjusted.
Although Restrictions can still be changed using Manage Single Rate, using "Manage Restrictions" makes it easy to change ONLY Restrictions.
To change the Rate Restrictions for multiple Rate Plans at the same time, go to Multiple Rate Restrictions
To view the Rate Restrictions entered for all of your Rate Plans, go to the Rate Grid
Rates Tab
There are four Rate Restriction settings:
- MIN LOS (Minimum Length of Stay): Requires a minimum stay for any booking arriving on the date chosen. I.e. 2 night MIN LOS on a Friday would require any booking made with an arrival date of Friday to stay 2 nights.
- MAX LOS (Maximum Length of Stay): Requires a maximum stay for any booking arriving on the date chosen. I.e. 4 night MAX LOS on a Sunday would require any booking made with an arrival date of Sunday to limit the stay to 4 nights.
- Arrivals: CTA (Closed to Arrival). If this box is checked, then the rate plan will be unavailable for bookings with this arrival date. I.e. Saturday is checked. A guest making a booking will not be able to choose Saturday as an arrival date.
- Closed (Closed to Availability): If this box is checked, then the rate plan will be completely closed to availability. This means that a booking can't be made to arrive or stayover on this date. Use this setting to completely close out availability for a date or date range.
Please note the difference between using "Arrivals" and "Closed".
- "Arrivals" effectively closes the Rate Plan and makes any Room Type it is assigned to unavailable to arrival on the channel the Rate Plan is allocated to I.e. website, GDS and Front desk.
- "Closed" makes any Room Type it is assigned to unavailable for arrival and/or stay-overs, meaning availability is completely closed on the channel the Rate Plan is allocated to I.e. website, GDS and Front desk.
To change the Restrictions for a Single Rate Plan:
- Go to SETUP | RATES | MANAGE RATES.
- "Manage Restrictions": Put a check mark in the box called "Manage Restrictions"
3. Select the Rate Plan: In the drop down menu, select the Rate Plan by putting a check mark in the box next to it.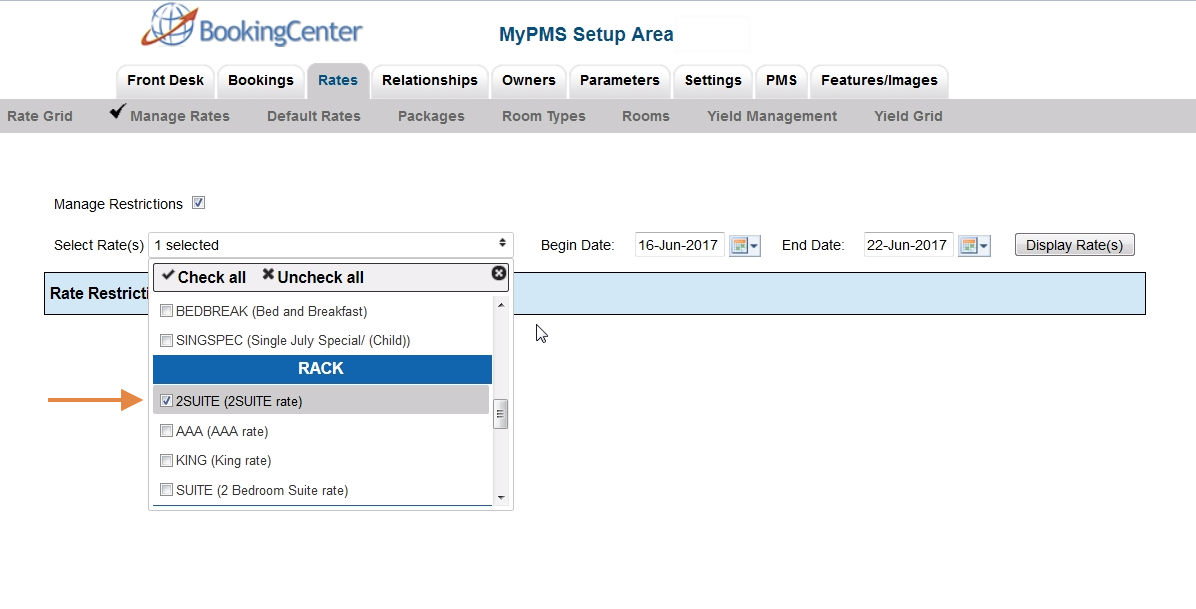
4. Select the date range: Select the beginning end date that you want to change. Choosing the correct date range is a very important part of managing rates.You can select any date range from one day, weekend, week or month to several years in the future.
- Changing rates is done in a seven day calendar view starting on the day of week corresponding to the "Begin on" calendar date chosen. For example, if you choose Oct. 1 - Oct. 30 and Oct. 1 lands on a Saturday, then the first day of the week displayed is Saturday.
- Although the date range selected is one month, the calendar will always display a seven day weekly view. This means that when you change a rate on the Friday night, it will change the rates for ALL Fridays from Oct. 1-Oct.30.
- The restriction changes you make will apply to ALL rates in the selected date range. If you are changing rates for a long date range like two years, then remember that it will over ride any short term changes made to specific time periods within the date range.
5. Click Display Rates: The Restrictions for the Rate Plan will display for the Date Range chosen, starting with the day of the week that the "Begins on" date falls on.
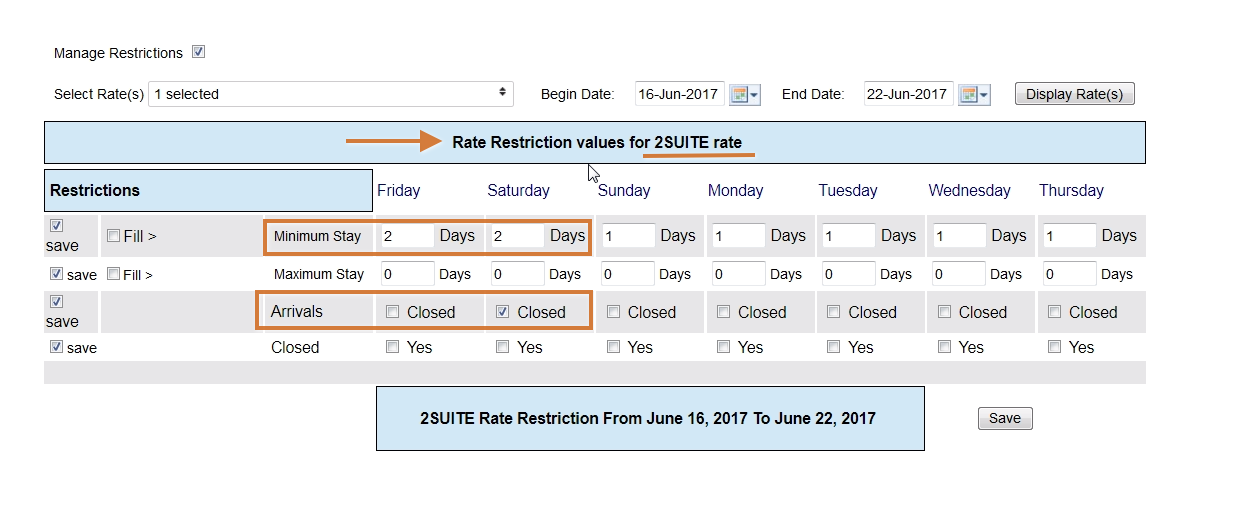
6. Enter Restrictions: Enter any changes to your Restrictions. See above for details on restrictions. Put a check mark in the "Save" box next to the line items you are changing and uncheck (leave blank) the line items you are not changing. Make your changes and click Save in the bottom right. I.e. If you are only changing the MINLOS, then click "Save" for that restriction only and uncheck the others. "Fill" is a useful feature to make changes across the week. Clicking the 'Fill' box will automatically fill the entire row with the amount entered in the first entry. This can be a real time saver!
7. Click Save
NOTE: if you want to change the Restrictions for another Rate Plan during the same date range selected, then just go to the "Select Rate" drop-down menu and click "Display Rates". The screen will change to display the selected Rate Plan which is shown in the blue box at the bottom of the grid.
Overview
Content Tools