All changes to Rates and Restrictions are made in SETUP | RATES | MANAGE RATES. Using the "Manage Restrictions" function allows you to display ONLY the Restrictions for a Single Rate Plan and change the Restrictions for multiple Rate Plans at the same time.
Although Restrictions can also be changed using Manage Single Rate, the "Manage Restrictions" function makes it easy to change ONLY Restrictions.
This function can be used for both Parent and Child Rate Plans, however Child Rate Plans will only appear in the drop down menu when "Manage Restrictions" box is checked.
Rates Tab
There are four Rate Restriction settings:
- MIN LOS (Minimum Length of Stay): Requires a minimum stay for any booking arriving on the date chosen. I.e. 2 night MIN LOS on a Friday would require any booking made with an arrival date of Friday to stay 2 nights.
- MAX LOS (Maximum Length of Stay): Requires a maximum stay for any booking arriving on the date chosen. I.e. 4 night MAX LOS on a Sunday would require any booking made with an arrival date of Sunday to limit the stay to 4 nights.
- Arrivals: CTA (Closed to Arrival). If this box is checked, then the rate plan will be unavailable for bookings with this arrival date. I.e. Saturday is checked. A guest making a booking will not be able to choose Saturday as an arrival date.
- Closed (Closed to Bookings): If this box is checked, then the rate plan will be closed for making bookings. I.e. if Sunday is checked, then a guest will not be able to make a booking on this date.
Please note the difference between using "Arrivals" and "Closed".
- "Arrivals" effectively closes the Rate Plan and makes any Room Type it is assigned to unavailable to arrival on your website, GDS and Front desk.
- "Closed" makes any Room Type it is assigned to unavailable for bookings on your website, GDS and Front desk.
Examples
Closed to Arrival- Using the "Arrival" Restriction for multiple Rate Plans | Closed to Booking - Using the "Closed" Restriction |
|---|---|
In this example, we want to adjust restrictions for all of our Rate Plans during the Summer months. To do this, select all of the Rate Plans in the "Select Rate" drop down list. Choose the date range - June 1- August 31, 2017 and click display rates. For this time period, we want to have a MINLOS for all weekends and Closed to Arrival on all Saturdays.
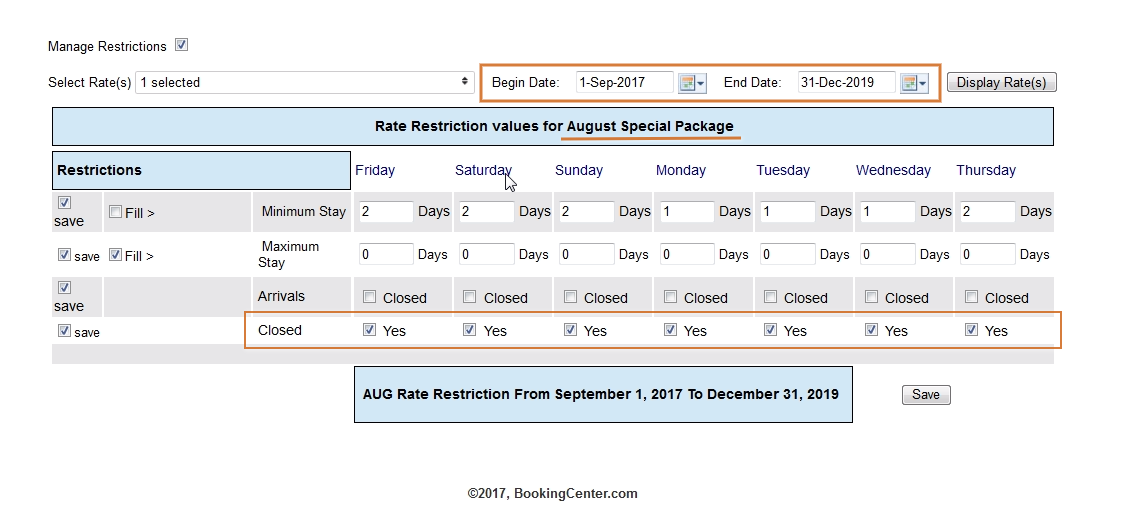
| In this example, we want to offer an August Booking Special. All bookings made in August for stay any time in the future will get a discounted rate. However, this plan is only available for booking during August. To do this, select the Rate Plan in the "Select Rate" drop down list. To close the rate plan to booking for all months except August, choose the date range from today's date - July 1, 2017 and click display rates. Check the "Closed" Box for each day and click Save. Then, change the date range to September 1- Dec. 2019 or a date in the future and repeat the steps. |
How to adjust Rate Restrictions
In order for a Rate Plan to appear in the "Select Rates" drop-down list, a Default Rate Plan must first be set up. Once a Parent or Child Rate Plan is set up, it will appear in the list and restrictions can be adjusted.
Each Rate Plan is assigned it's own Restrictions and can be adjusted for one Rate Plan or for multiple Rate Plans at the same time.
- If you choose one Rate Plan, then the restrictions will change for only the rate plan selected.
- If you choose multiple Rate Plans, then the restrictions will change for all of the rates selected.
For example, when a Rate Plan QUEEN has CTA checked for a specific date, then the QUEEN Room Type will be shown as sold out or unavailable for that date on all online channels. However, it can still be booked at the Front Desk with a Restriction message appearing.
Depending on the changes you need to make, use one of the these methods to change the Rate Plan restrictions. Read below for an overview of Manage Restrictions.
- Single Rate Restrictions: Change restrictions for a Single Rate Plan, unless selected for a multiple rate change.
- Multiple Rate Restrictions: Change restrictions for multiple Rate Plans at the same time
- Child Rate Plan Restrictions:
Note: To change the restrictions for Child Rate Plans, the "Manage Restrictions" box must be checked. If this box is not checked, then the Child Rates will not appear in the drop-down list.
"Save" : Use this feature to save only the specific items you are changing. When this box is checked the data in that lined will be saved. Even if you don't change the rate and are only changing restrictions, the rate entered will save for the time period selected. Therefore, if you are only changing restrictions and not rates, then uncheck the boxes next to the Rates. If you are only changing rates and not restrictions, then uncheck the Restrictions.
"Fill": This is a useful feature to make changes across the week. Clicking the 'Fill' box will automatically fill the entire row with the amount entered in the first entry. This can be a real time saver.
Overview
Content Tools