Images appear on your website and GDS and OTA sites. Each image category is allowed one image so be sure that you have the best photos available for this function. The size of the image is very important and must meet size requirements. Before you upload any images, please prepare your images according to these guidelines.
Prepare your images
- Image style: You can use any image and, In some cases, properties elect to make a collage of images. Collages can be used on your website. However, collage images are NOT allowed on GDS and OTA sites. Images straight out of a digital camera are not optimized for the Internet – they are very high resolution for printing. The average image size should be between 1-3mg.
- Image file format: Image files must be in .jpg, .gif, or png format, depending on the OTA channel you are targeting. Airbnb and VRBO require the most quantity, and largest size, images. Seek assistance via the Support Area if targeting one of these OTAs and you are having a hard time getting the image sizes correct.
- Size requirements: Images must adhere to the minimum and maximum pixel size, noted next to each image, or they will not properly display properly. All of the main images must be Minimum 1024 x 680 pixels. Any file over 3840 x 2160 will be automatically resized. Use an image editor to resize your image, save as a .jpg (recommended format). Tip: making all images the same size will insure best viewing. All thumbnails should conform to 100 x 100 min and 200 x 200 max.
- Thumbnail Images - Thumbnail images are used on your website booking engine and in the Booking by Inquiry function. To enable the thumbnails to appear on your website go to Edit Booking Engine Settings and choose "yes" for Display Thumbnail images.
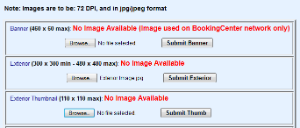
The Main Images used are:
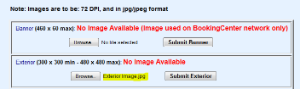
- Banner – Image Header above the Booking Screens on your booking engine. The optimum image is no more that 150 pixels high. Must not include phone numbers or e-mail.
- Exterior (300 x 300 min - 480 x 480 max):– Usually a road shot of the property.
- Exterior Thumbnail (110 x 110 max)
- Map (300 x 300 min - 430 x 430 max)
- Room Types (Minimum 1024 x 680. Any file over 3840 x 2160 will be automatically resized.)
- Item Images (Minimum Min: 600 x 300. Any file over 1080 x 1080 will be automatically resized.)
- Package Images (Min: 600 x 300. Any file over 1080 x 1080 will be automatically resized.)
- Tip - If you are replacing an image, often your browser will continue to display the old image even though you have uploaded a new image. Click ctrl + F5 to Refresh your
To add an image:
- Step 1: Find the name of Image in the List.
- Step 2: Click on the Browse button and a new window will open with your desktop file folders. Locate the image and double click or click open in the window.
- Step 3: The image name will appear next to the Browse button if it uploaded correctly. Then, click Submit.
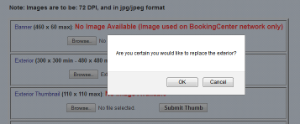
- Step 4: A message will appear asking to confirm the upload. Click Yes.
- Step 5: The image will appear in the list under the Image name. Above the image a message will appear stating whether image meets or does not meet required size dimensions. If it does not meet the required dimensions, then edit the image size and upload again. Click to enlarge these examples.


To edit or change an image
- Click Delete to delete the current image and then repeat the steps above.
See screenshots of each step below. Click on each image to enlarge.
Add Image: Steps 1-5 |
||
|---|---|---|
|
|
|
|

|
|
|
|
||
Overview
Content Tools