The Registers feature enables your computers to act as registers - accepting cash, credit cards, gift certificates, and traveler's checks, among others in real-time. The Point of Sale Module (POS) must be purchased as an Add-on Module for each computer to become a unique register.
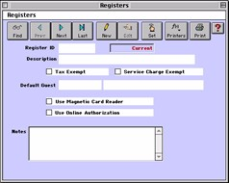
?Choose Parameters from the BookingCenter menu (or+ U) and choose Registers from the Inventory drop down list to display the Register Details window.
? Click on the New button.
? Enter the following information:
Register ID Enter a unique ID to identify this register such as "Register 1," "Bar," or "Front Desk."
Description Enter the description for this register to be used on the Sales and Registers Reports.
Tax Exempt Click this checkbox if you don't want to apply sales tax through this register.
Service Charge Exempt Click this checkbox if you don't want to apply a service charge through this register.
Default Guest Enter the ID of the default guest to use when making any sales from this register. If you do a lot of Cash
sales (off-the-street sales), then first create a new BookingCenter Guest called 'Cash Sales' and enter the
Guest ID in this field to make default sales from this register a Cash Sale account. If you normally add
Sales items from this register to active account for Guests staying "in-house" then do not worry about this
setting.
Use Magnetic Card Reader If you have a credit card reader attached to your computer and want to auto-enter credit cards, check this
box. If you will be typing all credit card data manually, then do not check this box.
Note You can still type credit card data into a Receipt even if you are using a credit card reader.
Use Online Authorization If this computer will be connected to the Internet to process credit card transactions, then choose this
setting. You would need to set up a gateway internet subscription with Authorize.Net or IBM through
BookingCenter to use this feature.
Note All Receipt Types that have been selected as "Credit Cards" and "internet Enabled" process via the
Internet if this option is checked. (See "Setting up Receipt Types" on page lvi)
Notes Enter any notes on this register.
? Click the 'Set' button to set the Register to this particular computer.
Printer Button Click this button to set up your register printers.
Note BookingCenter supports most high-speed thermal point of sale (POS) printers (i.e. Epson, Dymo,
PosJet) that connect directly to a serial port. In addition, USB POS printers that require a Macintosh or
Windows driver to function are also supported. However we recommend Epson POS products that come
with the necessary cables (power and serial) to connect the POS printer to a standard PC. Mac users
will need to purchase either a Mini iDoc or a Keyspan Adapter. Email support@bookingcenter.com for
support of other driver based POS printers.
? Click Find to locate a particular register or scroll through the registers using the Next or Prev buttons.
? Click Edit.
Register ID This field is automatically inserted.
Description This field is automatically inserted.
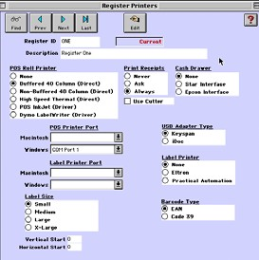
POS Roll Printer Click on a radio button to select the type of printer connected to this register. You may have to consult
the printer manufacturer's documentation to identify what type of printer you are using. If using the
Epson POS Printer supplied by BookingCenter, select the "Buffered 40 Column" option which is the
standard for POS roll printers.
Printer Receipts Select the appropriate option. If using the BookingCenter POS Solution, then select 'Always.'
• Never - Select this option if you do not want to print receipts from this register
• Ask- Select this option if you want the system to ask you if you would like to print a receipt from
this register.
• Always - Select this option if you would always like to print a receipt from this register.
Use Cutter Click this box if your POS printer supports auto-cutting of the receipt after a transaction.
Cash Drawer Click on the radio button to specify the cash drawer you use, if applicable. The Drawer will plug into the
back of the POS Printer and the printer will issue the 12 Volt prompt to open the drawer after each
transaction.
• None - Select this option if you do not use a cash drawer with this register.
• Star Interface - Select this option if you use this interface.
• Epson Interface -Select this option if you use this interface.
Docket Printer Port Select from the drop-down list the printer port that matches the serial or USB port you chose when
setting up the POS Printer. This must be the correct port in order to work correctly.
Tip Windows users enter a port in the Windows field but not in the Macintosh field and vice versa.
Macintosh Select the port your printer uses from the drop-down list.
Windows Select the port your printer uses from the drop-down list.
USB Adapter Type Select the type of adapter you are using. The iDoc option is for Macintosh users only.
Label Printer Port Select from the drop-down list to enter the label printer port in the appropriate field for your platform.
Tip Windows users enter a port in the Windows field but not in the Macintosh field and vice versa.
Macintosh Select the port your printer uses from the drop-down list.
Windows Select the port your printer uses from the drop-down list.
The features for Labels are optional and are not required to establish a POS register. They are intended for printing special labels such as bar codes and wrist printers from BookingCenter.
Label Printer Select your label printer type. If applicable.
Label Size Select the label size you require.
Barcode Type Select the barcode type you require, if applicable.
Vertical Start Set this to align the printing with your specific, unsupported printer.
Horizontal Start Set this to align the printing with your specific, unsupported printer.
? Click OK or [Enter] to save the new Register record.
See the FAQ in the Support area of the BookingCenter website (www.bookingcenter.com) for detailed instructions for Connecting the
BookingCenter Receipt Printer.
Connecting the BookingCenter Receipt Printer
Connecting the BookingCenter Credit Card Swiper
? Plug the A/C Adapter into the Epson Printer and the wall.
? Prepare the printer with a cartridge and paper as specified in the printer manuals.
? Connect the large serial end of the 'null modem' cable that comes with the Epson into the connector into the bottom of the printer (next to the A/C power cable).
? Connect the other end of the 'null modem' able that comes with the Epson (the small end) into the serial port of your PC.
? Plug the swiper into the free USB or PS/2 keyboard port of your computer.
? Plug free end into the keyboard.
Warning ! You must check the 'Use Registers' option in the System Configuration window to enable your Register Printer. Your POS Register Printer will not work if this is not done. (See "Click on the System Configuration button to display the System Configuration window." on page xxxv) .
Overview
Content Tools


