You should have the following codes once you have registered your BookingCenter software:
• Site ID
• Password
• Serial Number
• Lock Code
? If your BookingCenter software has prompted you to register, click Yes to register now and proceed to Step 5 below.
? Otherwise, proceed to Step 1.
1. Launch BookingCenter.
2. Choose Parameters from the BookingCenter drop-down menu.
3. Click on Company Information.
4. Click on Register.
The following window is now displayed:
!worddavb937fe520f7dad13c6806cfa6626f0b5.png|height=131,width=242!These radio buttons indicate the current mode Booking- Center is currently in.
These checkboxes indi- cate the modules that are currently enabled in Book- ingCenter .
5. Click on Edit.
6. Enter the following:
Site ID Your Site ID is used to identify you by BookingCenter.com. It must be correctly placed into your
software for you to use the Software and enter the BookingCenter.com Member's Area, Online Support,
and to market your property on the Internet.
Password Your Password enables you to enter the Member's Area of the BookingCenter.com web site, enter the On-
line support area, and synchronize your rates and availability with the BookingCenter Service.
Lock Code Your Lock Code will unlock your software and allow you access to the BookingCenter modules you
purchased. If you are coonnected to the Internet, BookingCenter will automatically register your
software's Lock Code.
The modules that you have purchased will now have their corresponding checkboxes checked with an 'x', thus enabling access to the features that you purchased.
The appropriate mode will also be selected indicating which version of the software you purchased.
Demo = Demonstration Mode
Lite = Less than 10 rooms
Pro = 10+ Rooms
File Backup = Backup to a local disk drive
Subscription Backup = BookingCenter servers offers nightly backup
Other Server Backup = Customer's own FTP server will be used for nightly backup
7. Click OK.
8. Click "Serialize."
The Serialize dialog box is now displayed:
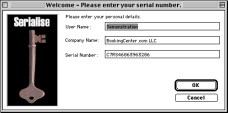
Note The Demo serial number appears by default until you enter your Serial Number. Leaving the Demo serial number unchanged will keep BookingCenter running in demo mode.
9. Enter the following:
User Name Enter your user name.
Company Name Enter your company name.
Serial Number Your Serial Number enables each of your computers to run the BookingCenter software.
10. Click OK OR Press {Enter}.
The following box is displayed:
11. Click OK to return to the System Registration window.
12. Close each window, eventually closing BookingCenter.
13. Restart BookingCenter again for the serial number change to take effect. BookingCenter is now
registered and unlocked for your use.
The BookingCenter splash screen will then be displayed. The splash screen displays the current version number of the software as well as the name and path of the datafile currently in use.
!worddav3c249f2b80b24b178bc91543e2a037a4.png|height=138,width=198!Indicates the current datafile in use as well as its location.
? Click on the splash screen or wait momentarily for it to close.
You are now at the BookingCenter Home window which provides quick and easy access to all of the day-to-day functions of the software.
The BookingCenter Property Management Software is now installed and ready to use!
Overview
Content Tools