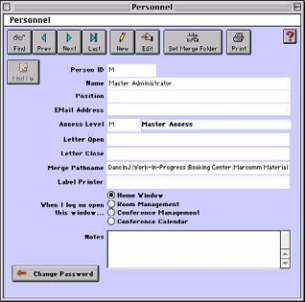
This sets up an ID, password, and Access Level, among other parameters, for each user (employee).
? Choose Parameters from the BookingCenter menu or ? + U to display the Parameters window.
? Click on the Personnel button located in the middle column to display the Personnel window.
? Click on the New button.
? Enter the following information:
Person ID Enter a Person ID code for this user.
Name Enter the user's name.
Position Enter this user's position.
Email Address Enter this user's email address.
Access Level Enter the access level ID that you already created in the previous section to assign to this person.
Note You will still need to enter an Access Level for this person even if you do not intend to use Logons to
gain entry to the system. Check the System Configuration window to see if you are using Logons or not.
Tip You can enter a '?' or just hit [Tab] to display an Access Levels lookup list.
Letter Open Enter the introductory remark you use on your letters.
Letter Close Enter the closing remark you use on your letters.
Merge Pathname By clicking the button Set Merge Folder, you create the pathname where the individual personnel Merge
files are located. You would use this feature to merge booking and guest data with a custom confirmation
letter you create in your word processing software. This way, each Personnel log-in can have their own
customized letters. (See "Printing/Emailing Custom Letters Using Data Merge" on page ciii)
Tip ! Read this section to learn how to make a custom Confirmation Letter.
We recommend that you use Microsoft Word, WordPerfect, or AppleWorks. If using Microsoft Word, use the Wizard for Setting up a Form Letter to create the basic Form Letter that will then be the basis for your Confirmation Letter.
? Create a new folder called 'Confirmation Letters' on your hard drive.
? Find your Personnel record in Personnel Window.
? Click the Set Merge Folder button.
Note This will tell BookingCenter where to place the file called CLNTMERG.TXT which is the data source created for use in Merge/ Form files. BookingCenter autogenerates this file for each Booking Detail.
? (See "Printing/Emailing Custom Letters Using Data Merge" on page ciii
Label Printer Note If you are using a Seiko EZ30 Smart Label Printer enter the full directory pathname of the printer driver in this field, otherwise leave emptyThe Seiko EZ30 Smart Label Printer is the only model currently supported by BookingCenter .
When I log on open this window...
Click on a radio button to select the default window to automatically open whenever this person logs on:
• Home Window
• Room Management
• Conference Management
• Conference Calendar
Notes Enter any notes .
? Click OK or press [Enter] to save this information
Note If you have 'Use Logons' enabled in the System Configuration window then the Change Password dialog box will be displayed once you click OK. If so then continue with the Password entry, otherwise click the Change Password button.
You will then be presented with the Change Password dialog box:
? Enter the following:
Old Password Enter this user's old logon password.
New password Enter this user's new logon password.
New Password Check Enter their password again to verify it.
? Click Change or press [Enter] to save their logon password.
If you have verified the password correctly then you will see the 'Password successfully changed!' message:
? Click OK or press [Enter] to return to the Personnel window.
? Close the Personnel window to return to the Parameters window.
Overview
Content Tools


