1. Click on the Guests button on the Home window. The Guest Details window will be displayed.
2. Click on the New button. The New Entry Options dialog box will be displayed. Click on an
appropriate radio button to select whether you want to make a 'New Entry' or a 'Clone Entry' and
then click OK.
Note A clone entry would be used to quickly create another guest record using the information from an already existing record.
3. The Enter new Guest window will be displayed with the next available Guest ID already inserted. If you selected 'Clone Entry' in Step 2 then any Address and Company information will also be replicated from the Guest record you are cloning.
Remember You can enter a '?' or just hit [Tab] in any field that requires a code to display the appropriate lookup lists.
Tip Enter as much or as little information that you deem useful.
4. Enter the following information:
Title Choose the appropriate title from the pick list.
First Name Enter the guest's first name. Press [TAB] to proceed to the next field.
Surname Enter the guest's surname.
Dear Choose Sir, Madam, or your own title.
Note This field is used for any correspondence generated by the system.
Company Enter the guest's company, if applicable. Position Enter the guest's position, if applicable. Address Enter the address.
Suburb Enter the suburb, if applicable.
State Enter the state.
Postcode Enter the zipcode.
Country Enter the country.
Hm Phone Enter the home phone.
Work Phone Enter the work phone, if applicable.
Mobile Enter the cell phone number, if applicable.
Fax Enter the fax number, if applicable.
E-mail Enter the email address, if applicable.
Flyer Number Enter the guest's frequent flyer number, if applicable.
Type ID Use the default code or enter your appropriate guest type code.
Note Enter '?' or just hit [Tab] to display a list of codes that you have already set up for your system. Then double-click on the desired line.
Source ID Use the default code or enter your appropriate source code.
Agent ID Use the default code or enter your appropriate agent code, if applicable.
Dietary Requirements Enter dietary requirements, if applicable.
Special Requirements Enter any special requirements, if applicable.
D.O.B. Enter the guest's date of birth, if desirable.
Gender Enter the guest's date of birth, if desirable.
Next of Kin Enter next of kin information, if desired.
Next of Kin Phone Enter next of kin phone number, if desired.
Live This can be used to set a Guest to NOT LIVE so that they are not returned as a set in Guest Marketing.
The most common use of this is when a Guest chooses to 'opt out' of future marketing efforts.
Company Account Choose this if the Guest record will actually be a 'Company Account' record. When this value is chosen,
the Guest is used to track 'Direct Bill' or 'Debtor Accounts'. A Guest set as a Company Account' is used
in a similar way as a normal guest, but the actual name that is placed on the Booking screen can be over-
written on the Booking screen so that the person from the Company is identified. By identifying the
Company Account, BookingCenter allows you to send invoices and statements. (See "Managing
Company Accounts (also known as 'Direct Bills' or 'Debtor Accounts')" on page xcvii for more
information.
Notes Click the Notes button to enter any Guest Notes. Any Office Notes entered in the Booking Details
screen for this guest will be also copied to the guest's permanent Notes record in the Guests screen.
5. Click OK to save the new Guest record. You will then be asked if you want to make a new booking for this Guest now. If so, click 'Yes' to open the New Booking window and enter a new booking for this Guest. If you click 'No,' you can enter the guest's credit card information.
Credit Card Details 1. If you would like to keep the guest's credit card details on record, click the Guests button on the
Home window. The Guest Details window will be displayed.
Tip If a booking was received by an online guest and they confirmed with a credit card, the credit
card details would be entered automatically.
Note BookingCenter uses SSL (the BEST online security protection) to capture credit card details and the BlowFish security algorithm to encode credit card details between the Central Reservation Service and the BookingCenter Software.
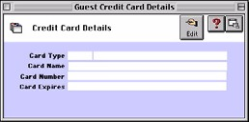
2. Click the Card Details $ button on the bottom left of the window. The Guest Credit Card Details
window will open.
3. Click the Edit button
4. Enter the following information:
Card Type Enter the credit card type by entering a receipt type code that you have previously set up. (See "Setting
up Receipt Types" on page lvi)
Note Enter '?' or just hit [Tab] to display a list of codes that you have already set up for your system. Then double-click on the desired line.
Card Name Enter the cardholder's name as it appears on the card.
Card Number Enter the card number.
Card Expiration Enter the expiration date.
Finding a Guest 1. Click on the Guests button on the Home window. The Guest Details window will be displayed.
2. Click on the Browse button. The Search for Guests dialog box will be displayed.
3. Enter the first few letters of either the Firstname, Surname or Company Name in the space provided
and then click OK. Any matches will be displayed in the Guest List. If multiple guest records are
displayed, scroll through the list to find the particular Guest that you seek.
4. Select the desired Guest from the list by double clicking on that line. The Guest window will open
with their details displayed.
Tip If you want to conduct another search or if you entered the wrong search criteria simply click
on the Quick Search button on the Guests List to display the Search for Guest dialog box
Overview
Content Tools


