All changes to Rates and Restrictions are done in SETUP | RATE | MANAGE RATES after a default Rate Plan is created. Once a default Rate Plan is set up, then it will appear in the drop-down list in Manage Rates,
If you need to add a new Rate Plan or change the description of the Rate Plan, see Default Rates
The Manage Rates feature allows you to quickly change rates and set restrictions such as, MINLOS, CTA, for a specific day or date range up to 57 weeks in advance. Often, this is used to manage rates for peak periods – Long Weekends, Special Events, Holidays, Weekly Rates, etc.
Managing Rate Plans
Each Rate Plan is assigned it's own Rates and Restrictions and is managed individually unless selected for a multiple rate change. If you want to change multiple rates at the same time using a % or $ adjustment. See Manage Multiple Rates.Restrictions and No. of Guests are unique to each Rate Plan and must be adjusted individually.Therefore,when changing those items, you must make the changes to each of the Rate Plans you need to adjust.
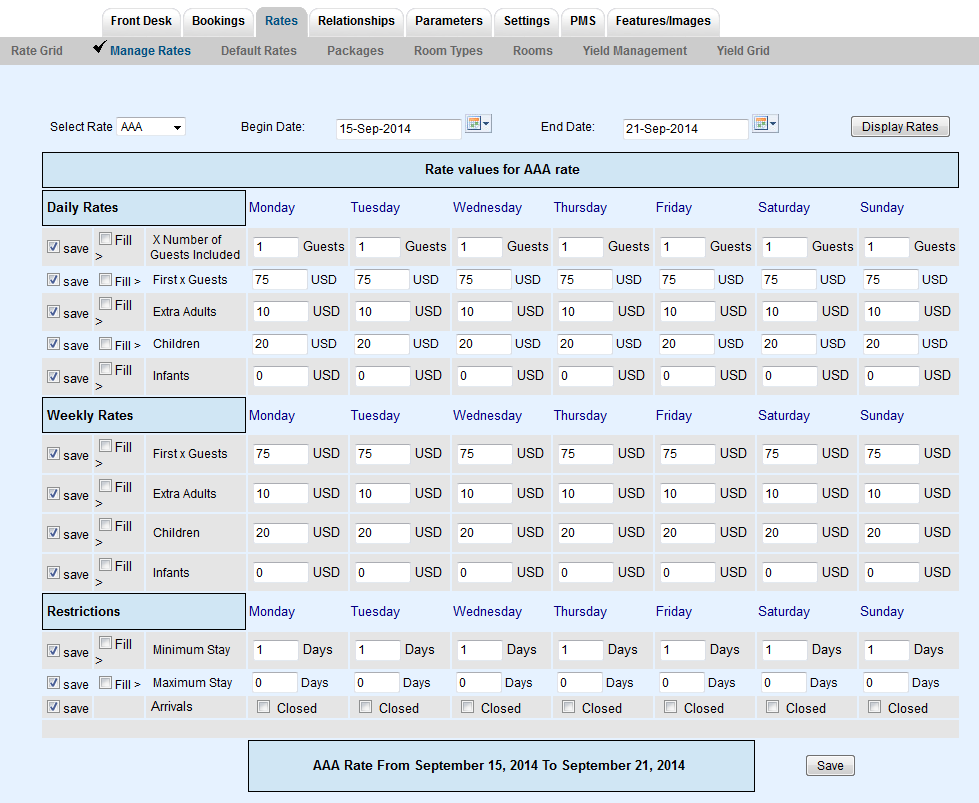
- Daily Rates can be managed either individually (Manage Single Rate) or for multiple Rate Plans (Manage Multiple Rates)
- Additional Adult or Children Charge: These are unique to each Rate Plan and must be adjusted individually .Therefore, when changing additional guest charges for any single rate, you must make the changes to each of the Rate Plans using the Manage Single Rate Plan method.
- Restrictions: Restrictions are unique to each Rate Plan and must be adjusted individually.Therefore, when changing Restrictions for any single rate, you must make the changes to each of the Rate Plans using the Manage Single Rate Plan method. See
- Weekly Rates: Rate Plans also have the option of including Weekly Rates. See Weekly Rates If you have unique weekly rates and want to enable the Weekly Rates feature, go to Booking Engine Settings
Manage Rates Sections
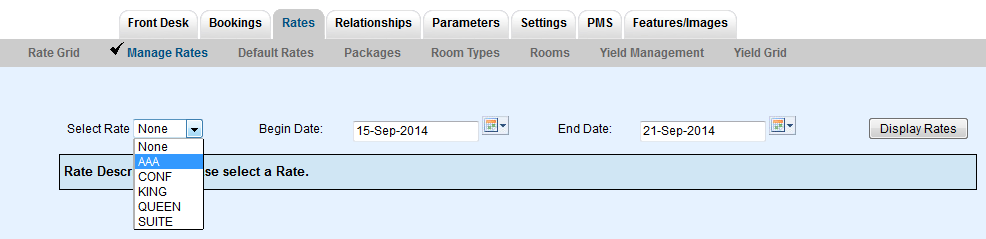
- Choosing a Rate Plan: From the drop-down menu, choose the Rate Plan that you want to manage. If you have created Rate Groups, then the rates in that group will display together with a header.
- Choosing a Date Range: Choosing the correct date range is a very important part of managing rates.You can select any date range from one day, weekend, week or month to several years in the future.Changing rates is done in a seven day calendar view starting on the day of week corresponding to the "Begin on" calendar date chosen. For example, if you choose Oct. 1 - Oct. 30 and Oct. 1 lands on a Saturday, then the first day of the week displayed is Saturday.Although the date range selected is one month, the calendar will always display a seven day weekly view. This means that when you change a rate on the Friday night, it will change the rates for ALL Fridays from Oct. 1-Oct.30. The rate changes you make will apply to ALL rates in the selected date range. If you are changing rates for a long date range like two years, then remember that it will over ride any short term changes made to specific time periods within the date range. For example, there are special rates entered for 4th of July weekend. The date range selected is through Dec. 2018. Any changes made through Dec. 2018 would override the the special rates and you will need to go the 4th of July weekend to reenter the rates.
- Using "Save" and "Fill": The 'save' box on the left determines if values for those fields are modified during the save process. It is enabled for all fields by default and should only be unchecked if you do not wish to modify a specific field. Clicking the 'Fill' box will make all entries for that row the same as the first entry. This can be a real time saver.
Manage Rates
Rates Tab
Related Topics
- Understanding Agent Channels
- Agent Types
- Room Type and Rate Plan Allocations
- Add Room Type Allocation
- GDS and OTA Allocations
- Manage Availability and Rates
- Rate Loading
- Promo Codes
- Special Agents
All Rate Plans must be managed individually. To get started, follow these steps.
- Go to RATES | MANAGE RATES. See figure 1.
- Choose the Rate Plan to manage from the drop-down list and the date range, then click Display Rates. A screen will automatically appear with the Rate Plan Information by Date. See Figure 2. below.
Figure 1. Choose Rate Plan
Managing Rate Plan
When you select a rate and a time frame and press Display Rates, the system automatically loads the rate for that time frame. If you've never edited the rate or stay options for that time frame the system loads the Default Rate. See Manage Single Rate Plan
Figure 2. Manage Rate Plan
Overview
Content Tools