Page History
| Section |
|---|
...
|
...
|
...
|
...
|
...
|
...
|
...
All Rate Plans must be managed individually. To get started, follow these steps.
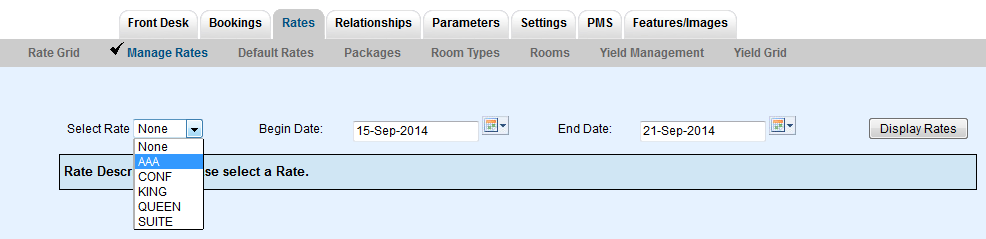
- Go to RATES | MANAGE RATES. See figure 1.
- Choose the Rate Plan to manage from the drop-down list and the date range, then click Display Rates. A screen will automatically appear with the Rate Plan Information by Date. See Figure 2. below.
Figure 1. Choose Rate Plan
Managing Rate Plan
When you select a rate and a time frame and press Display Rates, the system automatically loads the rate for that time frame. If you've never edited the rate or stay options for that time frame the system loads the Default Rate. See below for details on managing Rates.
Figure 2. Manage Rate Plan
...
To make changes to your Rates, follow these steps:
- First choose your date range and click Display Rates. This can be any length of time up to 57 weeks in the future. Click display Rates and then double check that you have the correct date range in the blue box below the grid. In Figure. 2 example, The Date Range for the AAA Rate is Sept. 15-Sept 21, 2014.
- Make changes in the following three sections:
Daily Rates:
- Enter the new $ Rate in the field titled First X Guests. I.e. In the example below, enter the new Rate in the box with $75. Enter this amount in all of the boxes that correspond to the day of the week you wish to change.
- Enter any changes to Extra Adults, Children and Infants
- Click Save to save changes
Weekly Rates:
- Enter the new $ Rate in the field titled First X Guests. I.e. In the example below, enter the new Rate in the box with $75. Enter this amount in all of the boxes that correspond to the day of the week you wish to change. If you do not have unique weekly rates, enter the same as the Daily Rates.
- Enter any changes to Extra Adults, Children and Infants
Restrictions:
- Minimum Stay: Enter the Minimum days of the stay. For example, if you require a 2 night stay over the weekend, enter 2 in Friday and Sat.
- Maximum Stay:
- Closed to Arrival: Check the closed box if this rate is NOT available on that particular day. For example, you have a special rate for the month of July, but you do not want it available on Sat.
...
|
Managing Rate Plans
Each Rate Plan is assigned it's own Rates and Restrictions and can be changed in four ways:
- Manage Single Rate Plan Change the rate and restrictions for a Rate Plan, unless selected for a multiple rate change.
- Manage Multiple Rate Plans Change multiple rates at the same time using a percentage % or dollar amount $ adjustment. Note: can not be used to manage the restrictions on a rate plan.
- Rate Grid - Daily Rate Change The Rate Grid also gives you the ability to change a rate on one day by clicking on the rate.
Restrictions and No. of Guests are unique to each Rate Plan and can be adjusted for a Single Rate Plan or multiple Rate Plans at the same time. There is the option to manage only the Restrictions of single or multiple rate plans at the same time using Manage Restrictions. To manage Child Rate Plan restrictions, see Child Rate Restrictions
...
How to Manage Rate Plans
- Daily Rates can be managed either individually with Manage Single Rate or for multiple Rate Plans with Manage Multiple Rates
- Additional Adult or Children Charge: These are unique to each Rate Plan and must be adjusted individually .Therefore, when changing additional guest charges for any single rate, you must make the changes to each of the Rate Plans using the Manage Single Rate Plan method.
- Restrictions: Restrictions are unique to each Rate Plan and must be adjusted in Manage Single Rate Plan. Therefore, when changing Restrictions for any single rate, you must make the changes to each of the Rate Plans using the Manage Single Rate Plan method. See Single Rate Restrictions
- Weekly Rates: Rate Plans also have the option of including Weekly Rates. See Weekly Rates If you have unique weekly rates and want to enable the Weekly Rates feature, go to Booking Engine Settings
Choosing a Rate Plan: From the drop-down menu, choose the Rate Plan that you want to manage. If you have created Rate Groups, then the rates in that group will display together with a header. if you want to change rates for another Rate Plan during the same date range selected, then just go to the "Choose Rate" drop-down menu and click "Update Rates". The screen will change to display the selected Rate Plan which is shown in the blue box at the bottom of the grid.
Choosing a Date Range: Choosing the correct date range is a very important part of managing rates.You can select any date range from one day, weekend, week or month to several years in the future.Changing rates is done in a seven day calendar view starting on the day of week corresponding to the "Begin on" calendar date chosen. For example, if you choose Oct. 1 - Oct. 30 and Oct. 1 lands on a Saturday, then the first day of the week displayed is Saturday.Although the date range selected is one month, the calendar will always display a seven day weekly view. This means that when you change a rate on the Friday night, it will change the rates for ALL Fridays from Oct. 1-Oct.30. The rate changes you make will apply to ALL rates in the selected date range. If you are changing rates for a long date range like two years, then remember that it will over ride any short term changes made to specific time periods within the date range. For example, there are special rates entered for 4th of July weekend. The date range selected is through Dec. 2018. Any changes made through Dec. 2018 would override the the special rates and you will need to go the 4th of July weekend to reenter the rates.
"Save" : Use this feature to save only the specific items you are changing. When this box is checked the data in that lined will be saved. Even if you don't change the rate and are only changing restrictions, the rate entered will save for the time period selected. Therefore, if you are only changing restrictions and not rates, then uncheck the boxes next to the Rates. If you are only changing rates and not restrictions, then uncheck the Restrictions.
"Fill": This is a useful feature to make changes across the week. Clicking the 'Fill' box will automatically fill the entire row with the amount entered in the first entry. This can be a real time saver.
...
Examples of Rate Plan changes:
| Column | |||||||||||||||||||
|---|---|---|---|---|---|---|---|---|---|---|---|---|---|---|---|---|---|---|---|
| |||||||||||||||||||
|
If you're looking for troubleshooting information, please try one of our Support Options!
| Section | |||||||||||||||
|---|---|---|---|---|---|---|---|---|---|---|---|---|---|---|---|
|
...
Overview
Content Tools