Versions Compared

Key

  • This line was added.
  • This line was removed.
  • Formatting was changed.


Section


Column

All changes to Rates and Restrictions are done in SETUP | RATE | MANAGE RATES after a default Rate Plan is created, or via the Rate Grid - Daily Rate Change.

Once a default Rate Plan is set up, then it will appear in the drop-down list in Manage Rates, If you need to add a new Rate Plan or change the description of the Rate Plan, see Default Rates If you've never edited the rate or stay options for that time frame the system loads the Default Rate.

The Daily Rates for Rate Plans can be managed either individually (Manage Single Rate) or for multiple Rate Plans (Manage Multiple Rates).

Restrictions, Weekly Rates and No. Number of Guests are unique to each Rate Plan and must be adjusted individually using Manage Single Rates.

If you want to make a % or $ increase/decrease or flat rate change to more than one rate at a time, then use Manage Multiple Rate Plans.

If you want to make a change to one rate, on one dateday,  then use Rate Grid - Daily Rate Change.


Column
width35%


Panel
borderColor#559ADE
titleColor#ffffff
borderWidth1
titleBGColor#559ADE
borderWidth1
titleRates Tab

Page Tree
rootRates Tab


Section

Rates and Restrictions: Each Rate Plan is assigned it's own Rates and Restrictions and is managed individually unless selected for a multiple rate change. If you want to change multiple rates at the same time using % or $ increase/decrease or flat rate change. See Manage Multiple Rates. Restrictions, Weekly Rates and No. of Guests are unique to each Rate Plan and must be adjusted individually.Therefore,when changing those items, you must make the changes to each of the Rate Plans you need to adjust.

Selecting Rate Plan and Date Range

  • Choosing a Rate Plan: From the drop-down menu, choose the Rate Plan that you want to manage. You can choose one or multiple rate plans at the same time.
    • If you choose one Rate Plan, then the restrictions will change for only the rate plan selected.
    • if you want to change restrictions for another Rate Plan using the same date range selected, then just go to the "Select Rate" drop-down menu, select another rate and click "Display Rates". The screen will change to display the selected Rate Plan.
    • If you enter a Group Name in the Rate Plan, then the rates in that group will display together with a header.
  • Choosing a Date Range: Choosing the correct date range is a very important part of managing rates.You can select any date range from one day, weekend, week or month to several years in the future.
    • Changing rates is done in a seven day calendar view starting on the day of week corresponding to the "Begin on" calendar date chosen. For example, if you  choose Oct. 1 - Oct. 30 and Oct. 1 lands on a Saturday, then the first day of the week displayed is Saturday.
    • Although the date range selected is one month, the calendar will always display a seven day weekly view. This means that when you change a rate on the Friday night, it will change the rates for ALL Fridays from Oct. 1-Oct.30.
    • The rate changes you make will apply to ALL rates in the selected date range. If you are changing rates for a long date range like two years, then remember that it will over ride any short term changes made to specific time periods within the date range. For example,  there are special rates entered for 4th of July weekend. The date range selected is through Dec. 2018. Any changes made through Dec. 2018 would override the the special rates and you will need to go the 4th of July weekend to reenter the rates.

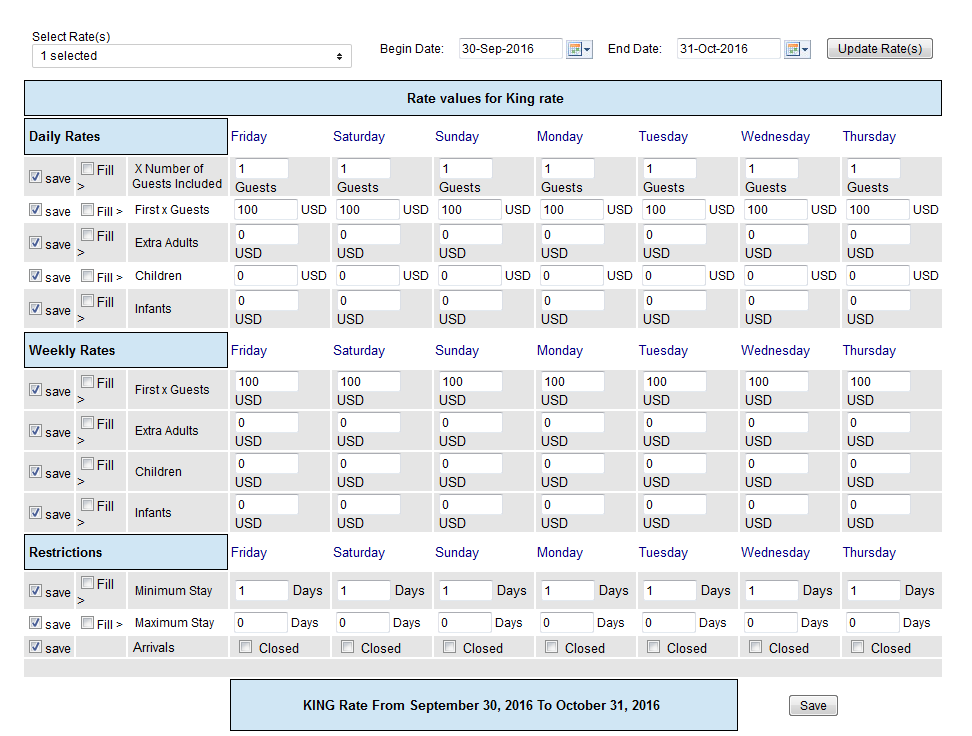
Weekly Rates: Rate Plans also have the option of including Weekly Rates. See Weekly Rates If you have unique weekly rates and want to enable the Weekly Rates feature, go to Booking Engine SettingsUsing "Save" and "Fill"

  • "Save" :  Use this feature to save only the specific items you are changing. When this box is checked the data in that lined will be saved. Even if you don't change the rate and are only changing restrictions, the rate entered will save for the time period selected. Therefore, if you are only changing restrictions and not rates, then uncheck the boxes next to the Rates. If you are only changing rates and not restrictions, then uncheck the Restrictions.
  • "Fill":  This is a useful feature to make changes across the week. Clicking the 'Fill' box will automatically fill the entire row with the amount entered in the first entry. This can be a real time saver
  • !


To Manage a Single Rate both with and without Weekly Rates enabled, follow these steps.
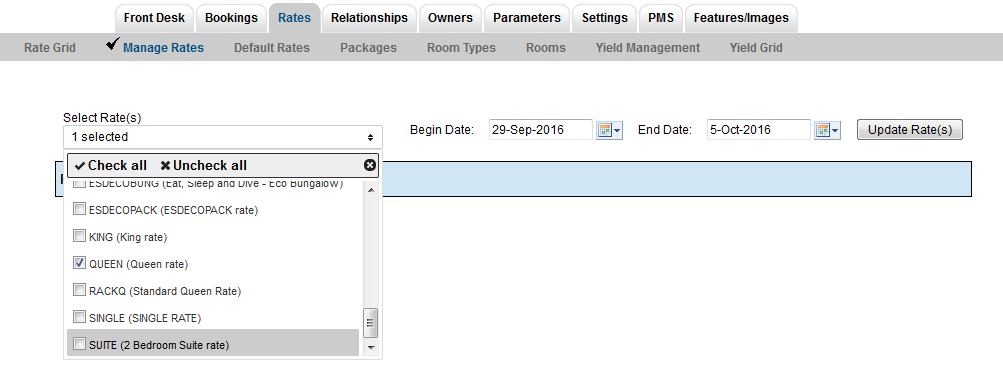

  • Go to SETUP | RATES | MANAGE RATES.

  • Choose the Rate Plan to manage from the drop-down list. From the drop-down menu, choose the Rate Plan that you want to manage.  If you have created Rate Groups, then the rates in that group will display together with a header. if you want to change rates for another Rate Plan during the same date range selected, then just go to the "Choose Rate" drop-down menu and click "Update Rates". The screen will change to display the selected Rate Plan which is shown in the blue box at the bottom of the grid.

  • Select the date range by choosing a "Begin Date" and and "End Date" Choosing the correct date range is a very important part of managing rates.You can select any date range from one day, weekend, week or month to several years in the future.

    Changing rates is done in a seven day calendar view starting on the day of week corresponding to the "Begin on" calendar date chosen. For example, if you  choose Oct. 1 - Oct. 30 and Oct. 1 lands on a Saturday, then the first day of the week displayed is Saturday.Although the date range selected is one month, the calendar will always display a seven day weekly view. This means that when you change a rate on the Friday night, it will change the rates for ALL Fridays from Oct. 1-Oct.30.

  • Click "Update Rates"


Section

A screen will automatically appear with the Rate Plan Information in the Date Range chosen, starting with the day of the week that the "Begins on" date falls on.

If you DO NOT have Weekly Rates enabled,

then the following screen will display

If you DO have Weekly Rates enabled,

then the following screen will display

Manage Rate Plans

Enter any changes to your Daily Rates and/or Restrictions. Put a check mark in the "Save" box next to the line items you are changing and uncheck (leave blank) the line items you are not changing.Make your changes and click Save in the bottom right to save changes.

If you want to change rates for another Rate Plan during the same date range selected, then just go to the "Choose Rate" drop-down menu and click "Update Rates". The screen will change to display the selected Rate Plan which is shown in the blue box at the bottom of the grid.

Daily Rates:

  • X Number of Guests Included: Defines how many guests are included in the base cost of a per person rate. Does not differentiate between adults/children/infants.For example, a Rate of $100 includes 2 persons. (Double occupancy rate0

  • First X Guests: Enter Daily Rate for the Number of Guests Included. For example, if a double occupancy rate is $100, then you would enter 100 in this field and 2 in the previous field, X Number of Guests Included.

  • Extra Adult – The amount you will charge for additional adults .(This only applies to Per Person rates)

  • Children – The amount you charge per additional child. (This only applies to Per Person rates)

  • Infants – The amount you charge per additional infant. (This only applies to Per Person rates)

Restrictions:

  • Minimum Stay: Enter the Minimum days of the stay. For example, if you require a 2 night stay over the weekend, enter 2 in Friday and Sat.

  • Maximum Stay: Enter a maximum stay if applicable.

  • Closed to Arrival: Check the closed box if this rate is NOT available on that particular day. For example, you have a special rate for the month of July, but you do not want it available on Sat.

Weekly Rates:

  • Weekly Rates are optional.To enable or disable Weekly Rates, go to SETUP | SETTINGS| BOOKING ENGINE SETTINGS. Go to the section titled "General" and choose "Yes" or "No" under "Use Weekly Rates". See Booking Engine Settings.
  • If you do not have special weekly Rates and the feature is disabled, then you will not see the weekly rates section.
  • If you do have Weekly Rates enabled, you will see the Weekly Rates section on the Manage Rates screen and can adjust the following information for the Rate Plan selected.
  • The Weekly Rates feature allows you to offer unique rates for bookings that are 7 days or longer. Therefore if a booking is made for more than 7 days, the weekly rate will be applied See. Weekly Rates

    • First X Guests: Enter Daily Rate for the Number of Guests Included. For example, if a double occupancy rate is $100, then you would enter 100 in this field and 2 in the previous field, X Number of Guests Included.

    • Extra Adult – The amount you will charge for additional adults .(This only applies to Per Person rates)

    • Children – The amount you charge per additional child. (This only applies to Per Person rates)

    • Infants – The amount you charge per additional infant. (This only applies to Per Person rates)