To set up the BookingCenter software exclusively for your property, you must first configure the Parameters.
Note: If you haven't yet entered your Lock Code ( issued by BookingCenter .com) you should do so before continuing any further! Your Lock Code will give you access to any additional modules that you purchased with the basic system. If you have purchased any additional modules but they remain disabled in the program then you may not have entered your Lock Code or entered it incorrectly.
Follow these steps:
- Choose Parameters from the BookingCenter drop-menu in the Home window OR? + U to display the Parameters window.
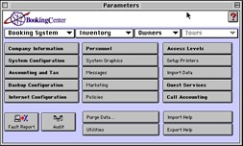
- Click on the System Configuration button to display the System Configuration window.
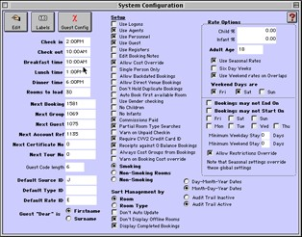
- Click on the Edit button. Configure the following settings:
- Check in: Enter your default Check-in time. This will be used as the default check in time for any bookings made but can be overridden.
- Check out: Enter your default Check-out time. This will be used as the default check out time for any bookings made but can be overridden.
Note:These default Check-in/Check-out times will appear on both the Booking Advice and Booking Confirmation. If the check-out time is AFTER the check-in time, your inventory will look 'booked' to an enquiry on the Service or through the Enquiry process.
- Breakfast/Lunch/Dinner time: Enter your lunch and dinner times in their respective fields.
- Rooms to Load: For customers with the Group Booking Module, enter the number of rooms you would like to load when making a booking enquiry for available rooms. The number of rooms you specify will load instead of loading all the rooms in your establishment, saving time and making the process more manageable.
- Next Booking: Enter the next sequential booking number you would like to assign.Note The demonstration datafile starts at 100.
- Next Group: Enter the next sequential group booking number you would like to assign if you have purchased the
Group Booking Module.
- Next Guest Enter the next sequential Guest ID number.
- Next Account Ref Enter the next sequential Account reference number.
- Next Certificate No Enter the next sequential certificate number to be issued upon completion of any conferences.Note This field only pertains to Conference enrollments. You can disregard this field if you won't be using the Conference Management module.
- Next Conference No Enter the next sequential conference number.Note This field is only relevant to new Conference s being entered. You can disregard this field if you won't be using the Conference Management module.
- Guest Code Length Enter the code length used by the system when generating new Booking and Guest numbers For example, code length of 4 would restrict you to a maximum number of 9999 bookings. Note The code length may be extended at a future date.
- Default Source ID Enter the Source ID that you would like to be the default and which is automatically assigned to all bookings made.
- Default Type ID Enter the default Guest Type ID to automatically assign to all new Guest records being entered. Note The demonstration datafile uses 'U' for Unknown.
- Default Rate ID Enter the default Rate ID to automatically apply to all new bookings being entered. Note The demonstration datafile uses 'U' for Unknown.
The Setup check boxes in the middle column activate or deactivate options that you wish to run within the software. A brief explanation of each option follows:
- Use Logons Check (activate) this box to require users to enter a personnel ID and password for verification each time BookingCenter starts up. This option restricts unauthorized access into the system and creates an audit trail.Warning ! Set up Access Levels and passwords for each of your personnel BEFORE you activate this option. Access Levels are set up in the 'Parameters' window.
- Use Agents Check to keep Agents and Agent Commissions on file within the system.
- Use Personnel Check if each user will be assigned his/her own ID (and password if you intend to use Logons). Note If you activate this feature, each booking will require an input.
- Use Guest Check to create and save Guest records in the system's database. a 'Guest Config' button will appear if you select this option. Note If you activate this feature, each booking will require an input.
- Guest Config Button

- Check 'Edit' to configure your Guest Records.
Guest Options:
- Detailed Guest Profile - Select this option if you desire every guest detail field to appear in the Guest Record for use.
- Use Companies: If you do not select 'Detailed Guest Profile' then check this option if you desirethe Companies field to appear on the Guest Record for use.
- Use Guest Types - If you do not select 'Detailed Guest Profile' then check this option if you desirethe Guest Types field to appear on the Guest Record for use.
- Enter New Guest on New Booking Window - This option is very convenient. Select this option ifyou would like the New Booking Window (used to enter the details of a booking) to capture all the Guest Details of a new guest instead of utilizing a separate Guest Record Screen prior to making the new booking
- New Booking Window Options: Select the details you wish to enter when making a new booking if you did not opt to use 'Detailed Guest Profile' above:Address, Work Phone, Mobile Phone, Fax Number, Credit Card Details
- Use Registers Check to use 'Registers' within the system, meaning that each workstation on your system can be uniquely identified as a sales outlet. This option also adds another level of Audit Trail to the system as it tracks inventory item sales through each 'Register' that you set up. Users of the POS Module would enable this feature.
- Allow Cost Override Check to have the option of overriding the Gross booking cost when entering a new booking or editing an existing booking.
- Single Person Only Check to make only single person bookings. (A hostel may choose this option where you book a bed and
- not a room.)
- Allow Backdated Bookings Check to be able to enter backdated bookings more than 14 days prior to the current system date.
- Note You would activate this option if you desire to enter bookings from your previous booking system that
- were made prior to the current system date.
- Allow Direct Venue Bookings Check to directly book a room set up as a Venue without having to book it through a Conference.
- Don't Hold Duplicate Bookings Check to not allow duplicate bookings to be entered for a Room. A message will be displayed indicating that the booking is a 'Duplicate.' Note Activating this option will not affect any existing Duplicate bookings ALREADYin the system.
- Auto Book first available Room Check to book the first available and appropriate room when making a booking.
- Use Gender Checking Check to not book males and females into adjoining rooms.
- No Children Check to disable the Children and Infants fields in the Booking windows.
- Commissions Paid Check to pay commissions for Agent bookings.
- Partial Room Type Searches If selected, a user can enter one or more letters/numbers of a Room Type code to find ONLY AVAILABLE rooms that contain that letter/number in the ID code.
- Warn on Unpaid Check In If selected, the system will alert you to any guest who owes a balance (i.e. deposit) upon check in.
- Require CVV2 Credit Card ID Select this option if you operate in a country that requires credit card authorization with the CVV2 field from the back of the card to process a transaction.
- Receipts against 0 Balance Select this option if you would like to have the ability to add receipts to null balance bookings, essentially creating debits.This makes the default Group Booking cost from Individuals.(See "Working with Group Bookings" )
- Always Cost Groups from Bookings
- Warn on Booking Cost
- Override Choose this option if you will be using Cost Override and do not want to be warned each time you do it.
- Smoking Click on a radio button to indicate the smoking policy of your establishment:
- Smoking - Indicates that you allow smoking in all rooms.
- Non-Smoking Rooms - Indicates that you have a combination of Smoking and Non-Smoking rooms.
- Non-Smoking - Indicates that all rooms in your establishment are non-smoking.
Sort Management by Click on the radio button to select how the Daily Room Management chart (Page lxxxv) is displayed.
Your selection here will be the default sort method whenever the chart is displayed.
• Room
• Room Type
- Don't Auto Update Check if you don't want the Daily Room Management chart to be automatically updated each time it isopened to reflect new arrivals, departures, etc. You would then have to click the 'Refresh' button on the Daily Room Management chart to update the chart before performing any functions. Note This option would be activated if you have a lot of rooms and/or a slow computer. You would then have to manually click Refresh to update the chart before performing any functions.
- Don't Display Offline Rooms Select this option if you do not wish to view offline rooms in the Room Availability Chart.
- Day-Month-Year Date Select how you want your dates entered and displayed. Month-Day-Year Dates your dates entered and displayed.
- Audit Trail Inactive Click on a radio button to disable audit trail within the system.
- Audit Trail Active Click on a radio button to enable audit trail within the system.
- Rate Options In the top right corner of the window enter the percentage discount charged for the following: Child % - Enter the percentage rate used to reduce the booking cost for children.Infant % - Enter the percentage rate used to reduce the booking cost for infants.
- Adult Age Enter the adult age for your property.
- Use Seasonal Rates Check this box if the system will use a seasonal rate matrix . (See "Setting up Seasons")nd (See "Setting up Rates") Six Day Weeks Check this box if you only require a six day stay as opposed to a seven day stay for the system to apply a weekly rate accordingly.
- Use Weekend Rates on Overlaps Check this box if you wish to apply different rates for weekdays and weekends for daily and weekly bookings that include both. Weekend Days are Select the days (Friday, Saturday, Sunday) to apply a weekend rate. (See "Setting up Rates")
- Bookings may not end on Select the appropriate day(s). This feature would be used, for example, if you require a minimum two night stay on weekends. Note If you use Seasons, this global restrictions is overridden. (See "Setting up Seasons" on page xlvi)
- Bookings may not Start On
- Minimum Weekday Stay X Days
- Minimum Weekend Stay X Days
- Allow Restrictions : Override Select the appropriate day(s). This feature would be used if, for example, you do not allow bookings to
- start on a Saturday.
- Enter the number of days as X if you require a minimum weekday stay.
- Enter the number of days as X if you require a minimum weekend stay.
Select this option if you would like to have the flexibility to manually override the stay requirements set above when making a booking.
Guest "Dear" is Click on a radio button to select how to address Guests in any correspondence generated by the system:
- Firstname - Indicates you will address all Guests by their first name.
- Surname - Indicates you will address all Guests by their surname.
- Click OK or [Enter] to save the current system configuration settings.
Overview
Content Tools